The idea was to have something that was less likely to get stolen but highly functional. I tossed the idea out to the folks on the Bike Forums, and most of them had some pretty good ideas, but the biggest takeaway for me was: don't go too high-end on the components, middle grade stuff should do the job just fine for a commuter. So I decided for a sort of "minimalist meets high performance" build.
I have built several bikes up from scratch, so I wasn't worried about putting a bike together, but I knew the project would take some time because most of the stuff in the parts bin did not fit the bill for my vision for this ugly, but highly functional bike. Plus, I raided most of the decent parts to make my winter bike.
In keeping with the project, step 1 was to find a bike that basically belongs in the dumpster except for the frame and fork. Chromoly steel makes a good material for this. My landlord left a 1991 Trek Antelope against the fence and it had been sitting out in the rain for an unknown amount of time (at least a year). It had also been raided for any half decent parts (which didn't matter because I knew I would be replacing everything anyway).
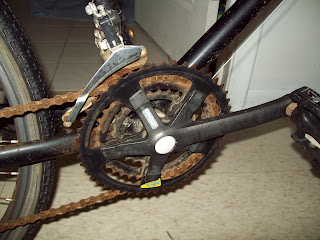
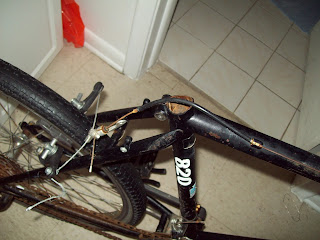
On day one of the project, I took the bike into my house and cleaned it up. And by "cleaned it up" I don't mean "made it clean"; I mean I removed enough of the rust and gunk to see what was underneath it all.
Basically, the chain was rusted out and stretched, the chainring was worn down to the point that it wouldn't hold a chain, the shifters were cracked and all the springs and mechanisms inside had fallen out, the saddle was missing, the hubs and rims were in pretty good shape but most of the spokes were rusted through, the cassette was completely rusted and worn also. The derailleurs were not in that bad of shape, but this was low quality stuff from 1991--not part of the plan for the restoration.
Well, you can probably see it just as well as I can explain it anyway. Notice the strategic placement in front of a toilet in the first pic...kinda symbolic...
A thread on the Bike Forums got me interested in doing a drop bar conversion. My goal was to do it on as tight a budget as possible, so I just used spare part bin parts to make the bike functional and then made one change at a time.
This bike has had many lives.
First, I just got it in working order with spare parts bin stuff, then, birthday after birthday I spent some money swapping parts out for stuff I really wanted on there as parts wore out or failed...
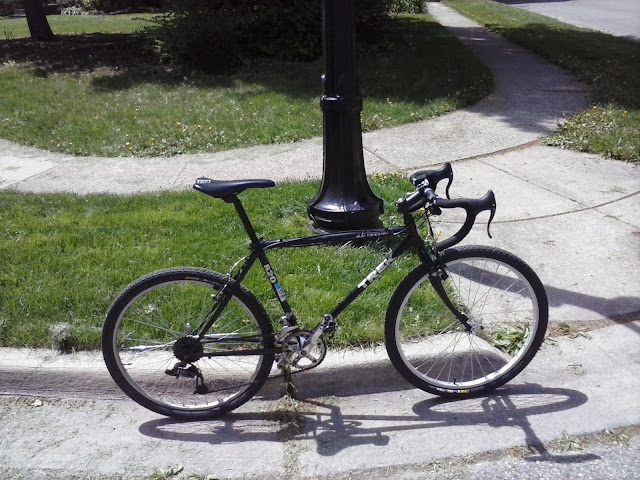
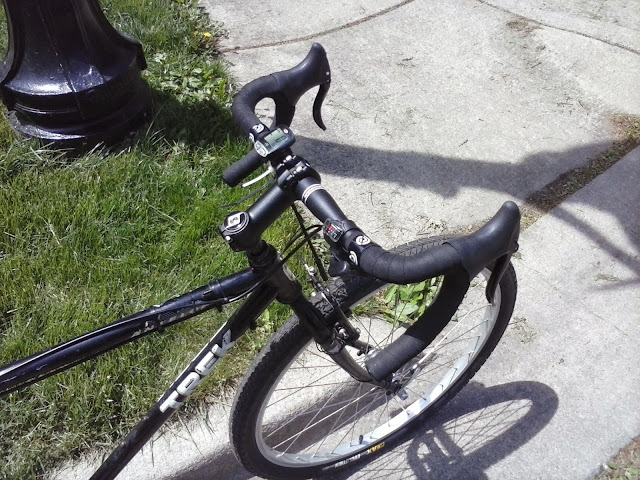
Here it is over two years from that first day I started work on it. It is about where I want it...I think. I converted to 1 x 8 gearing because I like it better--simpler, fewer parts to go wrong in the winter but still plenty of gears. Even though I didn't switch to 1 x 8 to save weight it actually did shave off a couple of pounds. That must have been a heavy crankset I took off because the front shifter and cable probably didn't weigh 2 lbs! The other parts shaved off another 1.25. That was kind of serendipity--I wasn't really looking to cut down on the weight of the bike, but just putting newer parts on there and switching to 1 x 8 for practical purposes chopped a total of 3.25 lbs off the bike.
BUDGET:
Here are details on how much I spent (approximate). If you plan to do a build like this, I think you should be thinking at least $200-$300 unless you already have a lot of the parts--I chose to do a FULL rebuild becuase I wanted everything to be new. This bike was ready for the trash though, so you might not have to overhaul as much. If you have brakes, chain, cassette and crankset that are in decent shape, you could maybe come out in the mid-$100s doing it this way. NOTE: that a big cost savings is the SRAM X3 derailleur becuase it is one of the few shifters that fit on the wider diameter dropbar. Otherwise you have to drop $100 on barend shifters or more than that on STIs, in which case you will also need new brakes unelss you already have calipers or cantilever brakes. (I discuss the different options and costs of doing a dropbar conversion in this post).
Front wheel ($40)
Rear wheel ($50)
Cassette ($25)
SRAM X4 rear der. ($15)
SRAM X3 shifter (adapted) ($15)
EVO seatpost ($15)
Avid Single Digit brake ($25)
Cannondale stem ($15)
Cannondale C3 comp dropbars ($15)
Origin 8 stem converter ($10)
Tektro RL520 Linear pull ($25)
Retrospec Saddle ($12)
Geax Evolution II tires ($24) ($12 each)
Bottom bracket ($20)
Rust-proof KMC chain ($15) (It really is rust-proof!)
TOTAL ..................................... $321
Most of these parts go on no questions asked, but the SRAM X3 shifter requires some tweaks.
It makes a great shifter for a 1 x 8 drop-bar project and is for sure the cheapest non-friction shifter you will find. But, it takes some tweaking if you go this route. It looks like the exact same thing can be done with the X4 too, but I haven't tried it to verify...
(STEP 6 is to simply attach it to the bar)...So far this is holding up much better than the first method! Feels pretty solid!
The X3 shifter has a plastic ring, and a metal ring inside of the plastic ring. At first, I just took the metal ring out and that was enough so that the shifter could fit on the larger diameter bar. However, the first time I had to lay the bike down it cracked (way too easily in my opinion). The SRAM X3 can still be used for this kind of project, but I now recommend the method given above rather than just removing the metal ring and attaching it with the plastic ring. A similar thing has been done with SRAM X7 shifters--taking off the original ring and replacing it with a new metal ring. (SEE HERE).
The SRAM X7, it involves aquiring materials and/or fabricating the new ring. The SRAM X3 involves simply taking the metal ring out, redrilling the hole about an extra mm total diamter (not much at all--it only took me a minute or two), taking off the top half of the plastic ring (mine broke anyway, but a simple saw would do the job in no time--the plastic ring is pretty flimsy), and then clamping the derailleur to the metal clamp. The bolt goes through the side with the enlarged hole (it won't reach far enough otherwise), and the undrilled side attaches to the shifter.
Here's the finished product:
Overall, I like this bike a lot more than anything I would have spent $321 on! This bike has been great! It is just about my favvvvvvorite bike to ride and feels at home in almost any condition. The more I ride it, the more I am impressed. Even comparing it back and forth between my Specialized Allez Sport Comp and my Specialized Carve (before it became "Crave") Comp, it holds its own! If you are thinking about joining the dropbar MTB craze, I highly recommend it!
It makes a great shifter for a 1 x 8 drop-bar project and is for sure the cheapest non-friction shifter you will find. But, it takes some tweaking if you go this route. It looks like the exact same thing can be done with the X4 too, but I haven't tried it to verify...
HERE ARE STEP BY STEP INSTRUCTIONS WITH PICTURES:
(STEP 6 is to simply attach it to the bar)...So far this is holding up much better than the first method! Feels pretty solid!
The X3 shifter has a plastic ring, and a metal ring inside of the plastic ring. At first, I just took the metal ring out and that was enough so that the shifter could fit on the larger diameter bar. However, the first time I had to lay the bike down it cracked (way too easily in my opinion). The SRAM X3 can still be used for this kind of project, but I now recommend the method given above rather than just removing the metal ring and attaching it with the plastic ring. A similar thing has been done with SRAM X7 shifters--taking off the original ring and replacing it with a new metal ring. (SEE HERE).
The SRAM X7, it involves aquiring materials and/or fabricating the new ring. The SRAM X3 involves simply taking the metal ring out, redrilling the hole about an extra mm total diamter (not much at all--it only took me a minute or two), taking off the top half of the plastic ring (mine broke anyway, but a simple saw would do the job in no time--the plastic ring is pretty flimsy), and then clamping the derailleur to the metal clamp. The bolt goes through the side with the enlarged hole (it won't reach far enough otherwise), and the undrilled side attaches to the shifter.
Here's the finished product:
 |
| Here the shifter is hooked to just the metal clamp/ring. |
Overall, I like this bike a lot more than anything I would have spent $321 on! This bike has been great! It is just about my favvvvvvorite bike to ride and feels at home in almost any condition. The more I ride it, the more I am impressed. Even comparing it back and forth between my Specialized Allez Sport Comp and my Specialized Carve (before it became "Crave") Comp, it holds its own! If you are thinking about joining the dropbar MTB craze, I highly recommend it!
Before I check out, let's see a final before-and-after of this Trek's evolution:
 |
| Toilet |
 |
| Adventure! |
Looks like a bike that was ready for the trash heap is now ready for adventures of all kinds--roads, gravel or even some light MTB trails!
VELOZOUT!


Saw your post on my 1.2 vs 1.5 (http://chitownmike.blogspot.com/2014/07/2014-trek-12-vs-2014-trek-15.html), very nice build!
ReplyDeleteWhat crank are you using? I was pondering doing another one again, but maybe with a GT frame since I really like their looks. Or a higher end Trek from, I really enjoyed my old mash-up and it was a blast to ride even if it was a little smaller than it should have been.
Yeah, mine is just a touch small as well. I think those Treks had a little bit of a cramped cockpit...one of the negatives of using them for a drop-bar build...They are TONS of fun though!
DeleteThe crank is a bottom-end road double takeoff from a Schwinn. I just took off the big ring and moved the small ring (42t) out to make it a single.
You'll have to let me know if you start another build. I would love to see what you do!