Thursday, May 14, 2015

THE LIFE OF A 1991 TREK ANTELOPE 820 -- DROP-BAR CONVERSION PICTURES

A little over two years ago, my commuter bike got stolen. Insurance covered the replacement value of the bike, which made me glad. But I started to dream up a wild plan--to build up an old beater/trashy bike with nice parts.

The idea was to have something that was less likely to get stolen but highly functional. I tossed the idea out to the folks on the Bike Forums, and most of them had some pretty good ideas, but the biggest takeaway for me was: don't go too high-end on the components, middle grade stuff should do the job just fine for a commuter. So I decided for a sort of "minimalist meets high performance" build.

I have built several bikes up from scratch, so I wasn't worried about putting a bike together, but I knew the project would take some time because most of the stuff in the parts bin did not fit the bill for my vision for this ugly, but highly functional bike. Plus, I raided most of the decent parts to make my winter bike.

In keeping with the project, step 1 was to find a bike that basically belongs in the dumpster except for the frame and fork. Chromoly steel makes a good material for this. My landlord left a 1991 Trek Antelope against the fence and it had been sitting out in the rain for an unknown amount of time (at least a year). It had also been raided for any half decent parts (which didn't matter because I knew I would be replacing everything anyway).

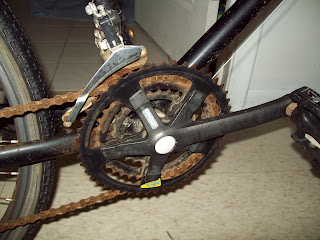
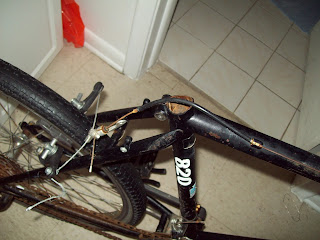
On day one of the project, I took the bike into my house and cleaned it up. And by "cleaned it up" I don't mean "made it clean"; I mean I removed enough of the rust and gunk to see what was underneath it all.

Basically, the chain was rusted out and stretched, the chainring was worn down to the point that it wouldn't hold a chain, the shifters were cracked and all the springs and mechanisms inside had fallen out, the saddle was missing, the hubs and rims were in pretty good shape but most of the spokes were rusted through, the cassette was completely rusted and worn also. The derailleurs were not in that bad of shape, but this was low quality stuff from 1991--not part of the plan for the restoration.

Well, you can probably see it just as well as I can explain it anyway. Notice the strategic placement in front of a toilet in the first pic...kinda symbolic...
1991 Trek Antelope before and after

rear wheel and derailleur

Old Trek bike antelope


Canti brakes Trek Antelope


A thread on the Bike Forums got me interested in doing a drop bar conversion. My goal was to do it on as tight a budget as possible, so I just used spare part bin parts to make the bike functional and then made one change at a time.

This bike has had many lives.

First, I just got it in working order with spare parts bin stuff, then, birthday after birthday I spent some money swapping parts out for stuff I really wanted on there as parts wore out or failed...

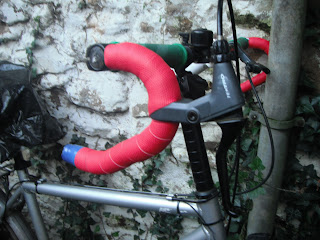
One of the Trek's first "lives"--New rear wheel, XT front derailleur I found at a surplus store for $12, 8 speed cassette, rust-proof chain, and Michelin City tires (26" x 1.4) I found for around $14 ea. I made fake bullhorns out of MTB bars and barends wrapped in handlebar tape. The bike was pretty fast in this setup, but the seat was an atrocity (old with bent rails), the front wheel was the original--it rolled smooth but the spokes were a little aged and it was still running in "single speed mode" because I still didn't have shifters or the rear derailleur I wanted to use (the one in the pic is the original).


Another one of the Trek's many lives. Here it appears in winter mode as a 3 x 1 speed snow destroyer. It is a 700c rear wheel with a 35mm cyclocross tire (Origin8 Stimul8er), paired with a 26 x 2.3 Bontrager XR4. You can see the total diameter of the wheels ends up being about the same. The 3 speeds seemed to be just enough in snowy weather when hands are so cold you don't want to shift unless you absolutely "have to" anyway...This was a FUN winter bike! Nothing like hitting a big pile of snow and just hearing >FOOFF<! Snow destroyed!

Here is the bike right before the final conversion. I ran it with those fake "aerobars" (bar ends mounted toward the center). The bike was pretty fast with this setup, as the makeshift "aerobars" seemed to allow for a pretty aerodynamic position. By this point, everything on the bike had been replaced except for seatpost, stem and handlebars.

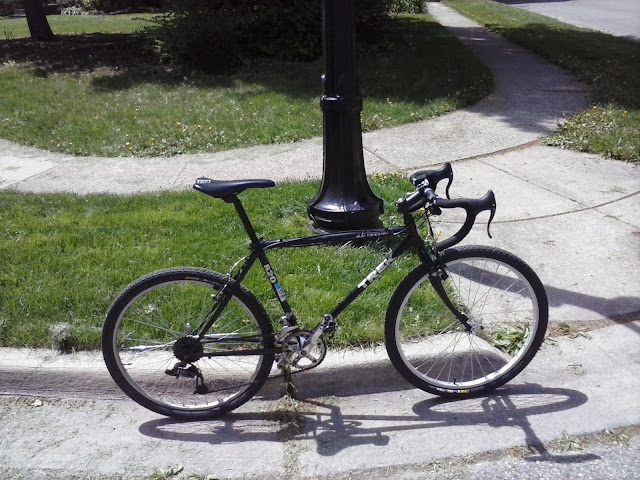
Here it is over two years from that first day I started work on it. It is about where I want it...I think. I converted to 1 x 8 gearing because I like it better--simpler, fewer parts to go wrong in the winter but still plenty of gears. Even though I didn't switch to 1 x 8 to save weight it actually did shave off a couple of pounds. That must have been a heavy crankset I took off because the front shifter and cable probably didn't weigh 2 lbs!  The other parts shaved off another 1.25. That was kind of serendipity--I wasn't really looking to cut down on the weight of the bike, but just putting newer parts on there and switching to 1 x 8 for practical purposes chopped a total of 3.25 lbs off the bike.


1991 Trek 820 drop-bar
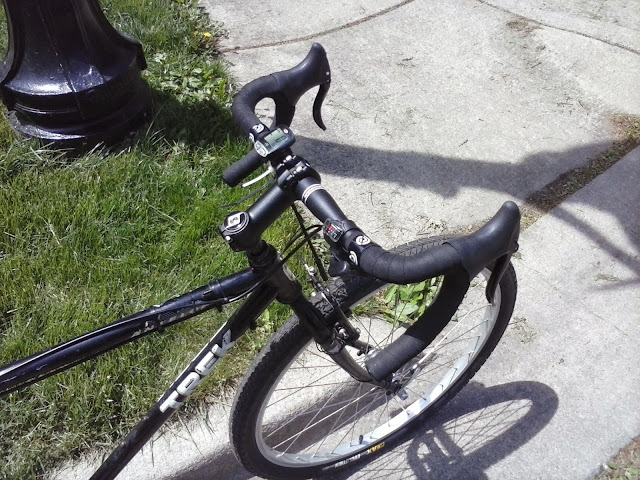
SRAM X4 rear derailleur, and SRAM trigger shifter (See below for how to adapt this shifter to drop-bar). 1 x 8 gearing set-up. GEAX Evolution ii tires 26 x 1.9 (they do it all--almost), Origin 8  adapter (1" threaded to 1 1/8" threadless), 100 mm Cannondale stem with 6* rise, Cannondale C3 (compact) handlebars, Retrospec saddle (a great buy at $12), Tektro RL520 linear pull lever with V-brakes, SPD pedals...OH-and Shimano XT FD on chain-keeping duty :)

trek 820 drop-bar conversion
The SRAM X3 shifter fits a larger diameter bar, but you have to adapt it by removing the top half of the plastic ring and attaching it to just the metal ring inside of the plastic ring (not shown in this picture). There are step-by-step instructions below on how to do this. I can shift up in the drops just by using my wrist. I can actually down shift from the drops too but only because my freakishly long thumb can reach. 

do it all bike
With the 1 x 8 gearing I have 32.1 gear inches at the bottom and 99.3 gear inches at the top. I use all the gears, but have never run out on either end. (It has roughly one more gear on the bottom, and one less at the top compared to my Specialized Allez Sport Comp).

BUDGET:

Here are details on how much I spent (approximate). If you plan to do a build like this, I think you should be thinking at least $200-$300 unless you already have a lot of the parts--I chose to do a FULL rebuild becuase I wanted everything to be new. This bike was ready for the trash though, so you might not have to overhaul as much. If you have brakes, chain, cassette and crankset that are in decent shape, you could maybe come out in the mid-$100s doing it this way. NOTE: that a big cost savings is the SRAM X3 derailleur becuase it is one of the few shifters that fit on the wider diameter dropbar. Otherwise you have to drop $100 on barend shifters or more than that on STIs, in which case you will also need new brakes unelss you already have calipers or cantilever brakes. (I discuss the different options and costs of doing a dropbar conversion in this post). 

Front wheel   ($40)
Rear wheel    ($50)
Cassette    ($25)
SRAM X4 rear der.   ($15)
SRAM X3 shifter (adapted)    ($15)
EVO seatpost    ($15)
Avid Single Digit brake    ($25)
Cannondale stem    ($15)
Cannondale C3 comp dropbars    ($15)
Origin 8 stem converter    ($10)
Tektro RL520 Linear pull    ($25)
Retrospec Saddle    ($12)
Geax Evolution II tires    ($24) ($12 each)
Bottom bracket    ($20)
Rust-proof KMC chain    ($15) (It really is rust-proof!)
TOTAL ..................................... $321

Most of these parts go on no questions asked, but the SRAM X3 shifter requires some tweaks. 
It makes a great shifter for a 1 x 8 drop-bar project and is for sure the cheapest non-friction shifter you will find. But, it takes some tweaking if you go this route. It looks like the exact same thing can be done with the X4 too, but I haven't tried it to verify...

HERE ARE STEP BY STEP INSTRUCTIONS WITH PICTURES:
mountain shifter on drop-bar


(STEP 6 is to simply attach it to the bar)...So far this is holding up much better than the first method! Feels pretty solid!

The X3 shifter has a plastic ring, and a metal ring inside of the plastic ring. At first, I just took the metal ring out and that was enough so that the shifter could fit on the larger diameter bar. However, the first time I had to lay the bike down it cracked (way too easily in my opinion). The SRAM X3 can still be used for this kind of project, but I now recommend the method given above rather than just removing the metal ring and attaching it with the plastic ring. A similar thing has been done with SRAM X7 shifters--taking off the original ring and replacing it with a new metal ring. (SEE HERE).

The SRAM X7, it involves aquiring materials and/or fabricating the new ring. The SRAM X3 involves simply taking the metal ring out, redrilling the hole about an extra mm total diamter (not much at all--it only took me a minute or two), taking off the top half of the plastic ring (mine broke anyway, but a simple saw would do the job in no time--the plastic ring is pretty flimsy), and then clamping the derailleur to the metal clamp. The bolt goes through the side with the enlarged hole (it won't reach far enough otherwise), and the undrilled side attaches to the shifter.

Here's the finished product:

trigger shifter on drop-bar
Here the shifter is hooked to just the metal clamp/ring.


Overall, I like this bike a lot more than anything I would have spent $321 on! This bike has been great! It is just about my favvvvvvorite bike to ride and feels at home in almost any condition. The more I ride it, the more I am impressed. Even comparing it back and forth between my Specialized Allez Sport Comp and my Specialized Carve (before it became "Crave") Comp, it holds its own! If you are thinking about joining the dropbar MTB craze, I highly recommend it!

Before I check out, let's see a final before-and-after of this Trek's evolution:


Toilet
1991 Trek 820 drop-bar
Adventure!

Looks like a bike that was ready for the trash heap is now ready for adventures of all kinds--roads, gravel or even some light MTB trails!
VELOZOUT!


Tuesday, May 12, 2015

WHAT ARE DROP-BAR MOUNTAIN BIKES? ...AND WHY?

There is something about a drop-bar conversion that makes your eyes almost pop out with excitement.

Just look at this:


drop bar mountain bikes

Like the mullet craze of the 80s, these bikes are part sleek and classy road-bike-business machine and part rough-and-tough, edgy and ready-to-party mountain machine.

On the MTBR forums, a post called "Bored? Post your drop-bar 29er" garnered over 300 posts! On BikeForums, nearly 4,000 posts have registered on the vintage mtb drop-bar conversion thread and it has been viewed more than HALF A MILLION TIMES since it was started in June 2012!

SO WHAT IS THIS DROP-BAR CRAZE ALL ABOUT?

As with past crazes a la Parachute pants, Cabbage Patch Dolls, Pogs and Tickle-Me Elmo, the world may never really know. These obsessions emerge like a Phoenix and then burn out almost without rhyme or reason, but the drop-bar conversion, as thrilling as it is to so many, may seem to be a little bit of a contradiction at first: Why take a MTB and make it...not quite a MTB anymore, yet not anything else really either...

Decades, nay, perhaps centuries, of trial and error have helped the velocipede to evolve into its more highly evolved counterparts: The road bike, the DH MTB, the XC MTB, the cyclocross bike, the city bike and even the newly emerging "gravel" bike are all dialed in to do a specific job--and to do it well. So, taking any one of those bikes, tearing stuff off and replacing it with very different "stuff" means the bike has been de-purposed in a way. So why do people like it? For the challenge of making it work? To have a more unique bike? To save money? Let's flush out the reason:

HOW DOES A DROP-BAR CHANGE THE BIKE?

First, putting a drop-bar on a mountain bike means more hand positions which translates into more comfort on long rides. Additionally, at least some (if not most) of the hand positions a drop-bar allow you to be more aerodynamic. 

Down in the drops you can duck down out of the wind--very useful on a road bike where speeds often exceed 20 mph (at least for some people). But aerodynamics do not matter as much on uphill mountain climbs at lower speeds. In fact, even in downhill mountain biking, gravity usually provides enough speed without having to worry too much about aerodynamic position. Not to mention, leaning over the front wheel ducked down is not the best position to be in while screaming down the side of a mountain! (Unless you love flying over the bar at 40 mph).

Additionally, for serious mountain riding, having a wide grip means more balance--something not provided on a 40 cm drop-bar...

So if "drop-bar mountain bike" is such a contradiction in terms, why the obsession? 

There are several reasons why people want to make the switch--and not all are good ones:


  1. Adding more hand positions to a veteran trusted commuter bike to increase the comfort or ability to duck out of the wind on really gusty days.
  2. Making your bike look more unique--more one-of-a-kind.
  3. To (try to) turn a mountain bike or hybrid into a "road" bike "on the cheap" (haha! More on this later)
  4. To (try to) turn a mountain bike or hybrid into a "cyclocross" bike "on the cheap"
  5. To (try to) make a kind of do-it-all machine that no other bike on the market really satisfies
To get some good answers we will tear these five reasons apart one-by-one. But first, some basics about making the switch that come into play for most of these. FIRST AND FOREMOST, the switch to drop-bars is usually not very parsimonious because doing it "right" involves changing more than just the bar... 

WHAT IS INVOLVED IN DOING A DROP-BAR CONVERSION?

Drop-bar conversions usually require a change of shifters because most drop-bars have a 23.8 mm diameter instead of the 22.2 mm grip area found on most MTB bars. This means that MTB shifters won't fit without some modification (making and attaching new clamps or reaming out your 22.2 mm clamps).
Additionally, the conversion usually requires new brake levers for the same reason--the larger diameter of the grip area on the road bar. But it gets even muckier...If you buy road brake levers to go with the 23.8 mm bar, they are probably not strong enough levers for your v-brakes, because v-brakes use a "linear pull" system and most (not all) road levers don't. However, road brakes are compatible with cantilever brakes--like these:
 Shimano Ultegra CX70 Cantilever Brake 

So if you already have them or are putting them on anyway (maybe as part of a "cyclocross" conversion) then you will be fine with normal road levers. Road levers also work with certain "short-pull" v-brakes, but their compatibility is hit or miss, so you have to be sure they state that they are compatible.

The other option is to buy linear pull road levers, like Tektro RL520s :
These work with linear pull brakes--like most v-brakes:
Shimano Deore T610 V-Brake 

Some have had success coming across a 22.2 mm drop-bar. This is a cheaper solution because you only have to buy the bar and some bar tape.

The issue here is that you may be negating many of the reasons why you are switching to drops because you will be unable to shift or brake in the drop position. So if your reason for switching to drop-bars involves ever going on group rides, you may stand out like a sore thumb in a pace line as everyone else is holding a nice aero position in the drops even while feathering the brakes and shifting to keep a nice steady cadence while you are bobbing up and down like the a goose with a broken wing flapping bombastically around while all the others are in a nice streamlined V.

This solution means you can't ride on the hoods (because there are none) or in the drops if you have to brake or shift (likely events!). You can buy a linear pull road brake and do the conversion for just the cost of the 22.2 mm bar, bar tape and the linear pull road brakes (about $60), but you have to make sure the brake levers will tighten down properly on the 22.2 mm bar (as most manufactures expect that you will be using them on a 23.8 mm "standard" road bar diameter. 

 I have seen this as an alternative:
mountain bike levers on drop bar conversion
This is said to work passably, and allows you to brake from the drops, but riding on the "hoods" of MTB levers can't be very comfortable (or safe? They are not made for it...)over long distances. This shows the creativity involved in many drop-bar conversions though! I have to respect it. 
You will notice that the picture above shows one other pretty cheap option for a drop-bar conversion: Drop-bar ends, like these made by Origin 8:
Origin8 Drop Ends
So, you just attach these to the ends of your mountain bars, and you are ready to go...sort of. You still have the issue of not being able to brake or shift from the drops unless you add new levers and shifters. 
IN SHORT: Drop-bar conversions, done properly, are not cheap and are not simple. Later, we will discuss all of the options and the cost of each option. But for now, let's look at the reasons people go to drop-bars to see if it's really worth it.

REASONS -- GOOD AND BAD -- FOR CONVERTING TO DROP-BARS 

#1: MORE HAND POSITIONS:


Adding more hand positions is not such a bad thing--especially if you are having numbness, discomfort etc. with your current setup. However, not all setups will work with all kinds of riding. Some people have used drops for even certain types of mountain riding and claim that it works well, but I didn't see anyone at the last Red Bull Rampage with 40 cm ergo drops! Just sayin'...

So even though drops aren't the idea extreme downhill setup they do the job just fine on most commuter or touring setups. BUT IF ALL YOU ARE LOOKING FOR IS A FEW MORE HAND POSITIONS, DROP-BARS ARE PROBABLY NOT THE BEST ANSWER.

This is because there are other options that are much cheaper: Bar ends or trekking bars are both good options that give you multiple hand positions without you having to also switch out the brakes (or brake levers) and shifters and involve little more than just buying the new bar and moving the old components (levers and shifters) over or moving the components in a little and fitting the bar ends on.

#2: Making a more unique "ride"

If you want to do a drop-bar conversion just to join in this nascent craze, then have at it! There is something just stunning about a full mountain machine with sleek, aerodynamic controls. It is sort of like a Mustang with off-road mud tires! 

So if this is your reason, have at it! It still won't be cheap to do it the right way, but if you know what it will take to do the conversion and are fine with the cost and the processes of getting it set up, then who am I to restrain you? 

#3: Trying to turn a MTB into a road bike on the cheap

Not a good idea. Really. Not. A. Good. Idea. Why? Go to Craigslist right now or to a month's worth of April garage sales and see how many decent road bikes you can buy for under $200. Now take out a pen and paper and jot down the costs you will incur to do a drop-bar conversion that will still not really be a road bike (more on that in a second):

  • New brake levers that can be used from the drops and to ride on the hoods: abt $25
  • New shifters. Bar-ends: abt. $80. Friction: abt. $15
  • OR "brifters" (brake/shifter combo): abt. $120 if you go cheap
  • A drop-bar: $25 if you find a killer sale
  • Bar tape: $10 if you go cheap
  • New brakes if you switch to brifter and don't have cantis: abt. $50 if you go cheap
  • Derailleurs if you switch to brifters and don't have compatible derailleurs: abt. $50 if you catch good deals
  • Rigid fork: abt. $75
Depending on what you already have, you are probably looking at over $200 or more to do it right.

If you can stand really cheap friction shifters, and already have a fully rigid bike, you can come out of it for about $75. 

If you already have a rigid fork, you can buy drop-bar ends, thrown 'em on there and wrap 'em you can come out for around $40. 

But, neither of those last two options will get you anywhere near a road bike. We haven't even mentioned the fact that the gearing on your MTB may not cut it as a road bike. If you switch out the drive train, you are easily adding another $100-$200. Plus, the geometry is going to be off. Your MTB probably has a much wider wheel base, probably a longer chainstay and a more upright (less aerodynamic) position. 

So, if you have a rigid bike with cantis and really just want to try it out, is it going to hurt anything to throw drop-bars on, a friction shifter and some road brake levers? Not really. For about $75 you can give it a go. But if you don't like it, you are set back $75 you could have put toward that CL bike for $175.

Don't misunderstand though, the fact that drop-bars won't make your MTB into a road bike doesn't mean that it won't make it more like a road bike. Adding slick tires and drop-bars, especially if they have a set up that allows you to shift and brake from the drops, will make your MTB a lot better fit in certain situations--like big group rides especially ones with well organized riding styles (like pace-lines). Although better doesn't necessarily even mean "good" or "good enough"...just better than it would have been if you take your 2002 full suspension MTB with knobby tires on a group ride. 

#4: Trying to turn a MTB into a cyclocross bike on the cheap

This goes down pretty much like #3, only worse. To have a decent CX bike, you really should have the right setup or you will PAY. Your 30 lb fully rigid steel MTB seems like a good candidate: It came with cantis, has plenty of mud clearance, and a more upright position. But you are going to need the right tires (prob. $50-$150 for a pair) and the right shifters and brakes (friction shifters probably won't cut it--at least not for optimum performance). Again, you probably have less desirable gearing (most CX bikes have a 48 or 50 big ring up front compared to the MTB's usual 42), geometry and the weight matters more in CX than any other disciplines (because you have to jump off and heft it over obstacles repeatedly). 

The one thing going for the MTB-to-Cyclocross conversion is that cyclocross bikes are NOT cheap. Even if you drop $200-$300 getting your bike set up, you will still come out ahead of anything you would even find on Craigslist or the World-Wide-Online-Garage-Sale, where you can easily drop $400-$500 even on a very cheap, used 'cross bike (that may need some work). Often, a $400 used cyclocross bike doesn't even include wheels. So, if you really want to try out cyclocross, a converted MTB might be your only choice if you don't have half-a-grand to burn. 

Then again, a lot of local CX races will let you use your MTB if you are new and just wanting to try it out. That would be the cheapest option by far--especially given the fact that the $200-$300 dollars you invest trying to switch over the MTB may or may not really have the cyclocross feel due to the different geometry and often TERRIBLE heft weight. 

#5: A new kind of machine

Throughout the 1990s, I wanted to try out road cycling, but didn't want to give up my ability to go have fun in the mountains, and I could only afford one bike (in terms of $$ and space). But, throughout the 1990s, more and more specialized bikes started to emerge. "Hybrid" bikes were promising in name but disappointing in practice, as they were (and are) basically road bikes with wider tires and slacker geometry. So, it left me almost giddy to see the emergence of dual sport bikes--bikes that can go off road a little bit, but are not a disaster on rides over 7 miles long on the road. 

Now, there seem to be bikes for almost everything--ALMOST everything. Creeping up is this notion that the sleek, lightweight road bike, with it's varied hand positions for comfort and varying levels of aerodynamic positioning can be a force in more and more terrains. 

Martyn Ashton and others piqued our wildest imaginations as they took to all sorts of terrains on road bikes in the Road Bike Party series of videos, making us wonder if the road bike has been too confined to neat and tidy spaces.
road bike party mountains
Road bike in mountains

Perhaps technology has advanced to the point that the speed, aerodynamics and light weight of the road bike can be leveraged in more extreme conditions. 

But there are still disadvantages. Most of us are not Martyn Ashton, and even for him, taking a road bike into these conditions proved a rather dangerous endeavor, ultimately resulting in his hospitalization. Of course, he was endeavoring rather skilled stunts that may have had adverse consequences on any bike. But the point remains: We are excited about what a road bike could do if it had a little more clearance, a little bit wider tires, and little bit slacker geometry. 

The cyclocross bike seems to fit the bill at first, but many people want something a little more than that. Sort of the love child of a dual-sport bike and a cyclocross bike. A bike that could take 50 mm tires, be made of beautiful road-buzz-absorbing bomb proof steel, and yet allow us to tuck into a deep aero position and blast away at 25 mph with confidence, even if a large stick or field of gravel unexpectedly unfold before us. Something that is fast, but not so tight that the front tire grazes the toe of your shoe if you turn too sharply. Truly, something that is part cyclocross, part dual-sport bike. 

Today, there is almost a continuum of bikes: Road, hybrid/city/urban, cyclocross, dual-sport, cross country, DH/FR...Perhaps there is one more major type of bike that the cycling public longs for--right in between cyclocross and dual-sport--the drop-bar mountain bike. A bike that can almost do it all, at least sort of do it all...

It seems that bike manufacturers are beginning to answer the call with what is being called "gravel bikes". Bikes that can bomb down fire-roads with road bike speed and grace but are not as "fragile" or sensitive as road bikes. Bikes that have nice varied hand-position options but also have a little space to sit up, widen your grip when things get a little rocky ***hehe***. Nice wide tires let you hit some serious bumps--afterall, 40-50 mm tires, when properly inflated take take care of a lot of shock absorption. Even those wimpy shocks on city bikes are mostly for the rider's psychological benefit (or because they don't know how to properly inflate tires...). Tires that run smooth and fast down the center, but have increasing grip as you move out to the sides--just in case you sink into some precarious situations. Grip if the tire starts to slip out, smooth if it doesn't.

It is said that Diamondback's Haanjo Comp is just such a bike, and reviews seem to attest to that. The bike that is comfortable almost everywhere:

Gravel bike

So maybe, this is the best reason of all to drop your MTB. At $1400 MSRP for the Haanjo Comp (and few other "gravel bike" options) the drop-bar is filling a niche--the affordable "gravel bike". And early 1990s steel MTB bikes seem to be prime victims--fully rigid, tough and durable road absorbing chromoly steel, plenty of tire clearance. Put 40-50 mm semi-slick tires on, a little bit wider drop-bar with linear pull road lever, and bar end shifters, and you have a machine that can almost do it all! Deflate the tires a little and your ride is comfortable sucking up bumps and jolts on cross country mountain rides, inflate the tires a little more and you are zipping down gravel roads--upright when you need more stability and in the drops when you want to really tuck in and get up some speed!

TOTAL COST: probably abt. $170 to do it "right", depending on what is already on the sidelines waiting to be used in the spare parts bin. 

HOW TO SET UP A DROP-BAR CONVERSION: OPTIONS

Option 1: The Poor Man's Drop-bar--TOTAL COST, abt. $25


Buy a pair of Origin 8 drop-bar ends (abt. $25) and roll with your old shifters and brakes. 
ADVANTAGES: Cheap and easy to do
DISADVANTAGES: Can't shift or brake in the drops, no hoods to ride on, wide "stance" in the drops

Option 2: The Poor Man 2--TOTAL COST, abt. $25

Find a 22.2 mm diameter bar that has a compatible clamp diameter to your stem. Put on the old brake levers and shifters.

ADVANTAGES: Cheap
DISADVANTAGES: Can't shift or brake in the drops, no hoods to ride on

Option 3: Bar Ends--TOTAL COST, abt. $130-$225 

Buy a nice standard road bar with 23.8 mm diameter, road levers (compatible with your brakes), and bar end shifters. 
ADVANTAGES: Works like a drop-bar setup "should"-can shift and brake in drops
DISADVANTAGES: Some prefer "brifters"--integrated brake/shifter levers

Option 4: Brifters--TOTAL COST, abt. $170-$375

Buy a nice standard road bar with 23.8 mm diameter and brifters. If your derailleurs aren't compatible, you will have to invest in those too.

ADVANTAGES: Works like a drop-bar setup "should"-can shift and brake in drops
DISADVANTAGES: Costs more than other options

Add tires to any option to make the bike more suited to your typical riding conditions --COST, abt. $25-$150

Nashbar, JensenUsa, BikeTiresDirect, ChainReactionCycles, and BikeWagon, and RandomBikeParts have some pretty good deals on all of the stuff you will need if you shop around and exercise a little patience!

SUMMARY:

*If you are just looking to add more hand positions to your bike, trekking bars or bar ends may be a quicker, cheaper and easier alternative to get you some additional hand positions, some of which are more aerodynamic.

*If you want to make your bike more unique by adding drop bars, it is an exciting trend that you can take part in. Just make sure you know the financial costs as well as what will be involved in changing the parts over--it is not just as easy as putting the drop bar on in place of the flat bar due to incompatibilities in brake levers and shifters from one bar to the next. 

*If you want to turn your MTB into a road bike--look elsewhere. You can make your MTB more like a road bike by putting drop bars and slicker tires, but you won't be able to change the more slack geometry or increased weight very easily! Adding drop-bars, especially when the setup allows you to shift and brake in the drops, will be more conducive to group rides compared to your old mountain bike. 

*Turning your MTB into a cyclocross bike won't work either. Your MTB will never be a cyclocross bike. However, if you don't have $400 or $500 just for a used or very low-end CX bike, it may be your only option. It is still going to probably set you back $200 even if you don't update your gearing to something that is more 'cross friendly. Check out your local races first as well--a lot of local races allow you to use your MTB the way it is if you want to try it out first to decide if it is even something you will do again. If you are going to do a UCI sponsored race, you better read all of their rules anyway, because even 42 cm drop bars are technically not allowed! (Have to be less than 40). 

*A new kind of bike. If you want a mountain bike that has lots of options--fast on the road, stable in gravel or some light cross country riding, can go on groups rides and can run in pace-lines while shifting and braking from the drops--the drop-bar MTB might be for you! 

Sure, it might be the bike that does almost everything OK, but nothing really well, but what could be more exciting than that? Taking a group ride in the morning on nice paved roads and keeping up, even if it is with a little more work, doing a cyclocross race at noon and getting a respectable time, and then going and blasting down a nice cross country trail in the evening just for fun--ALL ON THE SAME BIKE!

If the bike you want needs to be able to do everything confidently (even if not perfectly), and you don't have $1400 for a "gravel bike", you may be able to satisfy your do-it-all bike lust with a drop-bar MTB conversion. 

Favorite candidates are vintage, fully rigid steel MTBs (though you can "drop" any kind of MTB you want). They have stood the test of time, and have long been favorite commuter bikes. Now, they have another option--with the right tires, a drop-bar and some nice brake levers and shifters, your old MTB can do some serious gravel riding, and even hold its own pretty well on group road rides, cyclocross and even some light XC riding. 

Now if you will excuse me, I think I will go finish my own drop-bar conversion...

VELOZOUT!

Saturday, May 9, 2015

BIKE SPEED, WEIGHT, AERODYNAMICS AND TIRE WIDTH CALCULATOR


This calculator uses a formula derived from data collected from real world riding experiences. This calculator allows you to estimate the impact that bike weight, aerobars, tire width, distance of the ride and wattage have on speed.

For best comparisons, change just one thing at a time to see how much difference it will make on your speed!

EXAMPLE: Fill in all fields with your current bike's setup and weight, and your usual riding distances and watts (NOT SURE? Just fill out 15 for distance and 115 for watts). Then change just the bike weight, and see how much your speed will change. Or, change just the tire width and so on...


Bike Weight (in lbs):
 

Aerobars? Enter 1 for Yes and 0 for No:


Tire Width in mm *HINT: 1 inch =25.4 mm:


Distance of Ride (in miles):


Average Watts:


 mph

Friday, May 8, 2015

WHAT IMPACTS SPEED THE MOST: AERODYNAMICS, TIRE SIZE AND WEIGHT

There are a host of factors that are said to affect speed on a bike. Cycling cyberspace is filled with questions from newbies and veteran cyclists alike: How much faster will I be if I change my tires? Do narrow tires roll faster, or wider slicks? How much faster will I be if I drop 5 pounds off of my bike (or my waistline)?

Whenever such a discussion becomes sufficiently widespread, a mathematician seems to appear in the thread and set everyone straight, quantifying the exact impact of weight, drag, friction etc. on speed. Then the veteran cyclists appear with their usual: It's not the bike that determines speed, it's the engine. And then you wonder why people spend thousands of dollars on a bike if none of it matters. Why not just go buy a $20 Huffy at a garage sale?

All the advice out there is enough to make your head spin, instead of your wheels! So how do bike weight, tire size and aerodynamics (just to name a few) really impact speed (if they do at all)?

Because I, like most self-respecting cyclists, have a stable of different bike types, I decided to put it to the test and get some real numbers for myself.

And, like any good statistician, let me lay out my assumptions first and foremost.

ASSUMPTIONS

1) I am taking it for granted that extremely knobby tires are slower than slick tires. Not too many people would argue that. If you want to argue it, just put an a pair of DH heavy duty mud tires and go on a double century ride and let me know how it goes (see you in 9 hours--even if you are pretty fit! Haha!). So, not a single bike I used in the experiment has any significant amount of tread on the tires.

2) Shocks will slow you down! Once again, if you are thinking that putting shocks on a fully rigid MTB might help you speed up, I am sending you back on that double century again (let me know how it goes). Jumping on a trampoline while trying to move forward is not a good way to conserve energy that can be dedicated to forward momentum. So, shocks were not used in this experiment either. One bike (a 29er XC bike) has a front shock with full lockout, which was employed for all tests.

Now you may say, "I bet you my full suspension MTB with knobbies will be faster screaming down a mountainside in Virgin, UT compared to your road bike with 23mm road tires!" Well, you are probably right. Which brings me to the third assumption:

3) We are talking about road and paved trail speed here. No XC, CX or DH. No mountainsides. Just roads, and varying-degrees-of -smooth bike paths.

And, technically this is pseudo-science! The bikes were not chosen at random and I didn't really do anything to control how hard I was riding, or to record how much headwind there was on a given day. I basically picked a bike and tried to just ride how I usually would on that day without giving it too much extra thought. The one thing that does sort of account for the possibility that I was subconsciously favoring a certain bike is that I did control for wattage estimates on each ride. Nothing special, just the ones provided by Strava that may or may not be very accurate...

All distances, speeds and wattages were recording using a Strava app and an Android phone. Strava uses "moving time". So, if you slow down to 0, it discounts that from your total time. However, I never used the "pause" function on any ride. This means that the information on speed is somewhat "deflated"by time spent slowing down to stop at traffic lights or fix a mechanical problem or whatever.

So there are the assumptions. All laid out. And now, on to the rest of the experiment.

First, let's meet the bikes--


  1. 2011 Specialized Allez Sport road bike--mostly stock but SPD pedals and a 23mm Continental Grand Prix 4000s II.
  2. 2013 Specialized Carve Comp--swapped out pedals for SPDs and put Nashbar 35mm "road tires" that are actually more like CX tires...Image result for 2013 carve comp
  3. The Trek named "Conversion"--a 1991 Trek 820 frame and fork with a LOT of mods: 1 x 8 setup with a 42t up front and 11-32 in back, SPD pedals, Geax Evolution II tires, SRAM x4 shifter and RD, and some "aero bars" made out of bar ends installed toward the center of the bar. {picture coming}
  4. A 1 x 7 orphan bike named "Scratch". In just over an hour, it emerged from scratch like the monster of Frankenstein from my spare parts bin and a cheap aluminum Schwinn road bike frame one evening when I was needing to let off a lot of stress...{picture coming}

The advantage here is that we have a little of everything...Again, not highly experimentally controlled, but just happens to be a little of everything, but especially in terms of aerodynamic setup, tire width, and weight. Look at the bikes one-by-one

AERODYNAMIC OPTIONS

  1. Drop bars, pretty narrow profile, skinny 23 mm tires
  2. Very upright position, no drops, no aero option on the handlebars--just a very wide flat bar
  3. The improved aero bars actually do a pretty good job. The bike profile is not especially narrow, but made back when tubes were chromo steel and pretty thin. The Trek named Conversion boasts a wide tire profile though at 50mm...
  4. Scratch also has drop bars and a pretty narrow road bike profile. The tire is a little wider at 35mm which might create a little more drag...
TIRE WIDTH
  1. 700 x 23. About as narrow as it gets unless you go to 20s or something...
  2. For this experiment, the Carve is wearing 35 mm semi-slick CX tires.
  3. 50mm Geax Evolution IIs--the widest tires in this experiment
  4. 35mm Origin 8 CX tires--semi-slick (something like a Herringbone pattern in the center)
While there is really no debate about whether knobbies or slick roll faster on roads (it's slicks by the way) there is a lot of debate about what kind of slick tires roll the fastest. Some say that wider slicks decrease resistance, but there is greater drag as well that comes with the wider profile. 

There is also an issue of weight with the tires. It is common to hear that a heavier tire has a bigger impact on the overall weight of the bike than if that same weight were in, say, the frame instead. The argument is that rotational mass has a bigger penalty than other weight. However, the counter argument is that heavier tires may conserve momentum more than lighter tires. So you work harder to get them going, but they stay rolling easier. Additionally, wider tires seem to handle better on rougher terrain because they flex more over uneven surfaces and reduce wasted energy in the form of bouncing across terrain (instead of rolling smoothly). 

So what is the deal? Ultimately, which tire is faster? Well, in practice, we need only look at the Tour de France to realize that NO ONE is climbing the Alpe d'Huez  on 50mm semi slicks. So, in practice, what the best riders are using would suggest that the competition is not really between 20mm and 50s. The battle for speed is happening somewhere between 20s and 28s. However, in this experiment we have quite a range: 23mm up to 50mm. With all of the theory behind why wider tires should roll faster, why not have a 50 in the competition just to make a nice stark comparison?

WEIGHT


Over and over I hear veteran cyclists tell people: weight doesn't matter than much. Considering that you can spend THOUSANDS of dollars shaving grams, they have a point. But, again, I have never seen anyone rolling across the finish line in 1st place at the the Tour de France on a 30 pound steel bike.

The issue, though, is that in the Tour, seconds matter. So they spend thousands on their bikes just to shave off seconds.

Additionally, steel has seen something of a resurgence lately. Maybe the roads you cruise down are as smooth as an indoor track, but, living in a very rainy city with NASTY roads, I can really appreciate the way steel soaks up vibrations.

Image result for michigan potholes
This reminds me of Michigan potholes....
So, steel frames often have a weight penalty compared to aluminum or carbon, but they proffer an amazing ride, and are bomb proof! So, if you are on team steel, how much of a weight penalty is there? If you are on a budget and have to go with aluminum instead of carbon, will all your carbon friends drop you on that 50 mile group ride? Or is the difference largely negligible?

Here are how the 4 bikes "size up" in terms of weight:


  1. 22 lbs. The lightest of the four....
  2. 23.5lbs. Only an extra pound and a half and $1000 less than the MSRP on the Allez! BLAST!
  3. 27lbs. Not too bad for a 29er MTB...
  4. 28.6lbs of sheer steel--OK, steel alloy...(Chromoly). For most of the rides, this bike weighed in at 30.4lbs, but a switch-over on the cranks chopped off nearly 2 lbs. The appropriate weights were used on this bike in the statistical analysis depending on how much it weighed on any given ride. 

THE EXPERIMENT

Ok--pseudo-experiment. For 14 rides between August 2014 and the present, I switched up which bike I took on my solo training rides. I did not include any group rides because of the complexity of accounting for how much time I spend pulling vs. drafting and other group dynamics. 

For each ride, I used Strava, and afterwards recorded the distance of the ride, the average speed, average wattage, and I also made note of the route I took because the conditions are very different on the very bumpy/mixed terrain river trail, compared to the smooth/recently refinished old highway. 

Here are the preliminary results:


Bike 
Gearing
Weight (lbs)
Tires
Handlebars
Avg. speed
Avg. distance
Avg. diff. from route
Allez 
2 x 9 (50/36 x 12/28)
22.0
700 x 23
Drop
17.9
17.9
0.2
Scratch 
1 x 7 (42 x 14/34)
23.5
700 x 35 CX
Drop
16.0
15.6
-0.4
Carve w/ front lockout
2 x 10 (36/22 x 11/36)
27.0
29 x 1.4
Flat bar
16.1
8.7
-0.8
Trek MTB
1 x 8 (42 x 11/34)
28.6
26 x 1.95 semi slick
Flat with center aero bars
17.3
17.6
0.3


SURPRISE! At around 30 lbs, the steel MTB is only 0.6 mph slower on average than the 8-pound-lighter road bike! Actually, I have seen mathematical equations that suggest a 0.6 mph decrease for every 8 additional pounds of weight.

So far, the mathematicians get to pat themselves on the back and chalk up a point!

However, the results from the other road bike and the other MTB don't seem to "add up" in the same way. Why would a 30 lb steel bike be 1.3 mph faster on average than the 23.5 lb road bike, for example?

Well to really see what is going on, we need to step up our analysis a little bit and statistically control for different factors that may be at work here.


SPEED COMPARED TO ROUTE AVERAGE

But first, we can take care of one part pretty easily. It turns out that the different routes have different average speeds regardless of which bike was being used. Check out this table: 
So instead of talking about average speed from now on, we will talk about how much faster the bike is than what we expect it to be. That way bikes aren't penalized for being taken on slower, bumpier, curvier, hillier routes.


USING MULTIVARIATE REGRESSION

To make the other adjustments, we turn to a form of statistical analysis called "multivariate regression", but you don't have to know multivariate regression to understand the results...

In fact, I am not even going into the details of it, other than to say that we can now predict how much faster you will be compared to average based on 5 factors: RIDE DISTANCE, BIKE WEIGHT, TIRE WIDTH, AERODYNAMIC HANDLEBARS, and WATTAGE.

There is an equation that expresses how these things work together to predict speed:

SPEED DIFF=-0.055*DIST -0.123*WEIGHT -0.0495*TIRES +1.983*AERO +0.02237*WATTS -0.2053.

It works like this. If you keep all the other factors the same:

Each additional mile you add to the total ride distance is predicted to slow you down  .055mph
Each additional pound of bike weight slows you down 0.12mph
Each additional mm of tire width slows you down .05mph
Having an aero position on the bars speeds you up by 1.98mph

CONCLUSIONS:

So who is the grand winner? What impacts speed the most? Aerodynamics, Tire Size or Weight? We put all three on trial, and, when keeping everything else the same, having an aerodynamic position on the handlebars made the biggest difference. 

Specifically, having a more aero position on the handlebars means you can basically count on a 2 mph increase in your speed (at least I can!!).

The next biggest factor of the three was weight. Keeping everything else constant, each extra pound will probably slow you down by a MIND BOGGLING 0.12 mph. OK, so it doesn't sound like much, and basically it isn't. But it is something. The extra 8 lbs you carry on your average chromo steel bike compared just to aluminum means you are about 1 mph slower! That is a difference you are pretty sure to notice. 

Compared to a pretty nice carbon bike, your chromo steel ride is costing you almost 2 miles per hour! That puts some perspective into the argument. Now the next time  someone says not to worry to much about shaving weight of your bike, and someone else says, "If you have the money, go for it!" you can decide exactly how much it is worth to you. Just multiply the weight savings in pounds by 0.12 and that is the difference you may be able to expect on your speed. 

So, if you can pay $100 to drop a pound off your bike, you can expect an increase of 0.12 mph in your speed. Only you know if it is worth it to you, but now you have hard numbers to use in making a decision, but with $100 to burn on a bike upgrade, I would probably drop that money on a pair of aero bars if you don't already have them based on these numbers, and get almost 20 times the speed boost you would get from dropping a pound of weight!

As far as tire width, it looks like the pros are on to something with their skinny tires--usually between 23 and 28mm. I like have 50mm tires on my the Trek named Conversion though because it completes the great "all-arounder" feel on that bike. It is a bike that can hold its own on the roads, but is not afraid to jump of onto some fire roads, gravel or even some XC- or CX-like terrains. So what are those 50mm tires costing me in terms of speed? 0.05 mph for each millimeter. Because I am about 25mm over the average road bike, they are costing me about 1.25 mph. So that tiny multiplier of 0.05 mph lost per millimeter of tire width can really add up! So, tires can make a big difference. Not to mention that dropping to skinnier tires would probably drop a little weight off the bike as well. 

PUTTING IT ALL IN PERSPECTIVE

My beloved chromo-steel Trek costs me compared to my Allez Sport:

  • The extra 8 lbs cost me about 1 mph, and 
  • the 50 mm tires cost me about 1.25 mph, compared to the average road bike tires
  • If I do not use my makeshift aero bars, it costs me almost another 2 mph
In total, a rigid steel MTB at around 30 lbs, without an aero bar setup and with 2" slick tires is about 4.25 mph slower than the typical aluminum entry-level road bike!

Bad news if you love your steel bike? Well, for me, I make it work by putting a little more effort (WATTAGE!) into my rides on the steel bike--probably because I am having so much fun destroying those potholed roads of Michigan. If you love it, it can work for you too. But this pseudo experiment backs up what we already know watching the Tour de France about the best bike setup if nothing but speed matters:

  • Get the lightest bike you can legally ride (14 lbs) 
  • Go as skinny as you can afford to go on tires before the ride gets too harsh
  • Have an aero option on your handlebars (biggest impact!)
But, for those of us not in the Tour, now you have enough information to tell you exactly how your favorite ride will probably impact your speed!

IMPACT OF AERODYNAMICS, TIRE SIZE AND WEIGHT CALCULATOR


Multiply
by
Distance of ride
-0.055
Bike weight
-0.12
Tire width
-0.05
Aero bars (y=1/n=0)
1.98
Avg watt
0.02
Then add it all up and subtract .21
That will be your predicted speed improvement (or decrease if negative)